My Guide for BBQ Pork Shoulder
A Journey Eleven Years in the Making
Since getting my smoker in 2014, I’ve been on a relentless quest to perfect my pork shoulder BBQ. After countless experiments, temperature failures, and late-night smoking sessions, I’ve finally cracked the code for consistently delicious, repeatable results.
This isn’t just another BBQ recipe - it’s a battle-tested system that delivers restaurant-quality pulled pork every single time. Let me share what I’ve learned through years of trial and triumph.
Phase 1: The Brine - Building Flavor from Within
The Science of Brining
Brining isn’t just about flavor - it’s about transforming the meat’s structure at a molecular level:
- Salt penetration breaks down proteins for tenderness
- Moisture retention prevents the meat from drying out
- Even seasoning throughout the entire cut
- Enhanced browning due to protein changes
My Signature Brine Recipe
For 8 lbs of pork shoulder:
Base Brine:
- 1 quart cold water
- 3 oz Morton’s Kosher Salt (specifically Morton’s - the crystal size matters)
- Optional: 2-3 tablespoons quality pickling spice blend
Pickling Spice Additions (if desired):
- Bay leaves
- Whole peppercorns
- Coriander seeds
- Mustard seeds
- Allspice berries
Brining Process
- Dissolve completely - Stir salt until no crystals remain
- Submerge fully - Use a food-safe container that fits in your fridge
- Time it right - 8-24 hours (longer for larger cuts)
- Keep it cold - Maintain 40°F or below throughout
- Weight if needed - Keep meat fully submerged
Phase 2: The Slather - Flavor Adhesion Layer
Why Slather Matters
The slather serves multiple purposes:
- Rub adhesion - Helps seasonings stick to the meat
- Moisture barrier - Prevents excessive drying during smoking
- Flavor enhancement - Adds another layer of complexity
- Bark development - Contributes to crust formation
My Secret Weapon: Siete Foods Botana Sauce
Why this specific sauce works:
- 🌶️ Jalapeño heat - Subtle kick without overwhelming
- 🥑 Avocado oil base - High smoke point, clean flavor
- 🧄 Garlic notes - Complements the rub perfectly
- 🌿 Natural ingredients - No artificial additives
Application technique:
- Pat meat completely dry first
- Apply thin, even layer with hands or brush
- Don’t oversaturate - less is more
- Let it sit while preparing your rub
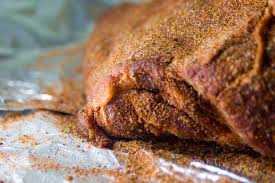
Phase 3: The Rub - Meathead’s Memphis Dust
The Science Behind This Blend
This isn’t just a random spice mix - every ingredient serves a purpose:
| Ingredient | Amount | Purpose |
|---|---|---|
| Dark Brown Sugar | ¾ cup packed | Caramelization, bark formation |
| White Sugar | ¾ cup | Quick caramelization, balances salt |
| American Paprika | ½ cup | Color, mild pepper flavor |
| Garlic Powder | ¼ cup | Savory depth |
| Black Pepper | 2 tbsp | Heat, complexity |
| Ginger Powder | 2 tbsp | Warmth, tenderizing enzymes |
| Onion Powder | 2 tbsp | Umami depth |
| Rosemary | 1 tbsp | Aromatic, piney notes |
Mixing and Application
Rub preparation:
- Mix thoroughly - Combine all ingredients in large bowl
- Break up clumps - Ensure even distribution
- Store properly - Airtight container, lasts 6 months
- Make extra - This recipe makes enough for multiple cooks
Application technique:
- Generous coating - Don’t be shy with the rub
- Press firmly - Help it adhere to the slather
- All surfaces - Don’t forget the ends and bottom
- Rest time - Let it sit 30+ minutes before smoking
Phase 4: The Smoke - Low and Slow Perfection
Temperature Control: The 225°F Sweet Spot
Why 225°F is magic:
- Collagen breakdown - Optimal temperature for connective tissue conversion
- Fat rendering - Slow, even melting without burning
- Smoke absorption - Allows deep penetration of wood flavors
- Moisture retention - Prevents rapid water loss
Wood Selection: Pecan Power
Why pecan wood specifically:
- 🌰 Mild, nutty flavor - Won’t overpower the pork
- 🔥 Clean burn - Minimal bitter compounds
- ⏰ Long-lasting - Burns slower than fruit woods
- 🎯 Versatile - Works with all BBQ styles
Wood preparation:
- Chunk size - Fist-sized pieces work best
- Seasoned wood - At least 6 months dry
- Soaking myth - Don’t soak! Dry wood smokes better
- Amount needed - 4-6 chunks for 6-8 hour cook
The Smoking Timeline
Hour-by-hour breakdown:
Hours 0-2: Heavy smoke, temperature stabilization
- Monitor smoker temp closely
- Add wood chunks as needed
- Resist urge to peek!
Hours 2-4: Crust development phase
- The Stall may begin around 160°F internal
- Maintain consistent temperature
- Add wood if smoke becomes thin
Hours 4-6: The stall and beyond
- Internal temp may plateau 160-170°F
- This is NORMAL - don’t panic!
- Patience is key during this phase
Hours 6-8: Final push to 203°F
- Temperature climb accelerates after stall
- Begin checking hourly with probe thermometer
Phase 5: The Texas Crutch - Breaking Through the Stall
Understanding the Stall
What’s happening:
- Evaporation cooling - Moisture evaporation keeps temp steady
- Collagen conversion - Tough proteins breaking down
- Natural process - Not a problem to solve, just manage
When to Wrap
Timing indicators:
- Internal temperature: 160-170°F
- Bark formation - Nice, dark crust developed
- Stall duration - Temperature plateau for 2+ hours
- Time concerns - Need to speed up for serving deadline
Wrapping Technique
Materials:
- Heavy-duty aluminum foil (preferred)
- Butcher paper (alternative for firmer bark)
- Optional: butter, brown sugar, or apple juice
Method:
- Remove from smoker - Work quickly to retain heat
- Double wrap - Two layers of foil for security
- Seal tightly - No steam should escape
- Return to smoker - Continue cooking to target temp
Phase 6: The Final Push to 203°F
Why 203°F is the Magic Number
Temperature science:
- Collagen conversion complete at this point
- Probe tender - Thermometer slides in like butter
- Optimal texture - Falls apart but isn’t mushy
- Food safety - Well above minimum requirements
Testing for Doneness
Multiple indicators to check:
- 🌡️ Internal temp - 203°F in thickest part
- 🔪 Probe test - Thermometer inserts with no resistance
- 🥩 Jiggle test - Meat moves when gently shaken
- ⏰ Time factor - Usually 12-16 hours total
Phase 7: The Rest - Patience Pays Off
The Science of Resting
Why rest is crucial:
- Juice redistribution - Moisture moves back through meat
- Continued cooking - Residual heat finishes the process
- Temperature equalization - Hot spots even out
- Easier handling - Safer to shred when slightly cooler
The Cooler Method
Setup process:
- Preheat cooler - Fill with boiling water, let sit 10 minutes
- Empty and dry - Remove all water, towel dry interior
- Towel lineup - Place clean towels in bottom
- Wrap meat - Keep in foil or wrap in fresh towels
- Insulate well - More towels on top and sides
- Time range - Rest 6-12 hours (seriously!)
Rest Duration Guidelines
| Cook Size | Minimum Rest | Optimal Rest | Maximum Rest |
|---|---|---|---|
| 6-8 lbs | 2 hours | 4-6 hours | 12 hours |
| 8-10 lbs | 3 hours | 6-8 hours | 14 hours |
| 10+ lbs | 4 hours | 8-12 hours | 16 hours |
Troubleshooting Common Issues
Temperature Problems
Smoker running hot:
- Close vents partially
- Add water pan for heat sink
- Check for air leaks
- Move meat to cooler zone
Smoker running cold:
- Open vents wider
- Add more fuel
- Check for blockages
- Wind protection may be needed
Quality Concerns
Dry meat:
- Brining step skipped or rushed
- Temperature too high during cook
- Not enough fat left during shredding
- Insufficient rest period
Tough texture:
- Not cooked to proper internal temperature
- Rushed the process
- Poor quality meat selection
- Inadequate rest time
Timeline Planning
Day before:
- Purchase ingredients
- Mix rub blend
- Start brine process
- Prepare smoker fuel
Cook day:
- Remove from brine (morning)
- Apply slather and rub
- Start smoker
- Plan for 12-16 hour total time
Advanced Tips and Variations
Competition-Style Modifications
For contest-quality results:
- Injection: Apple juice + brown sugar mixture
- Butter glaze: During wrapping phase
- Presentation: Clean, uniform shreds
- Turn-in box: Perfect cubes for judging
Happy smoking, and may your bark be dark and your meat be tender!